As I try and teach myself the "proper" way to light a studio portrait, I thought I'd take the time to share what I'm learning with you if for no other reason than to solidfy the information in my mind.
There are five basic portrait lighting set-ups and the first one is paramount lighting. Paramount lighting is also called butterfly lighting because of the shadow that forms under the subject's nose. (See image above)
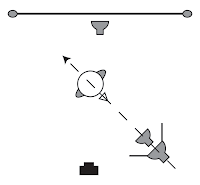
Looking at the lighting diagram, you can see that the basic set up has both the key light and the fill light on the same line at a 45º angle from the camera line. The lights are set one above the other. The downward angle of the key light produces the harsh shadow under the nose and the diffused fill flash reduce the harsher shadows under the chin.
You'll also notice that in the diagram there is a flash unit aimed at the backdrop. Your subject should in front of the backdrop far enough so that none of the light from the key and fill lights (or as little of it as possible) reflect off the backrdrop. If you want your backdrop to be visible you'll need to light it separately.
One final note. Almost all portrait lighting set-up diagrams will include a hair light which is placed above and a little behind the subjects head so that the light it projects falls on the back and side of the head "rimming" or creating a halo effect as it reflects off the subjects hair. This is to separate the subject from the background adding depth to the portrait. I don't have it here because it's not strictly necessary although it can be very helpful with certain subject and backdrop combinations.
By the way, you don't need a lot of expensive equipment to do these set-ups. You can find cheap off-camera flashes at any camera store. I purchased my flashes at
Midwest Photo Exchange for $85. Click on the "Strobist" link on the navbar on the left-hand side of the site to find basic lighting kits and accessories and check out the Strobist blog for more off-camera flash info.


 Another great place to find photographic opportunites is your local art museum. The Cincinnati Art Museum is one of the best and since Michelle and I happened to be in town, we thought we'd stop by. I was unpleasantly surprised to find that they now charge $4 for parking but that was offset by the news that there is no longer a charge to enter the museum.

 Looking at the lighting diagram, you can see that the basic set up has both the key light and the fill light on the same line at a 45º angle from the camera line. The lights are set one above the other. The downward angle of the key light produces the harsh shadow under the nose and the diffused fill flash reduce the harsher shadows under the chin.
 Sometimes you drive all day to get to a location and the weather's crap and the best image you get all day is what you see below. Is your afternoon wasted? Not necessarily. Using a few simple Photoshop tools and a filter, you can make something outta nothing.
  Above and beyond the subject matter, the interplay of light space versus shadow or contrast is what makes or breaks a black and white photograph. When I switched this image to black and white, I lost a lot of detail in the cloud cover and fiddling with the brightness and contrast sliders just wasn't getting it done for me so I had to switch to the burn and dodge tools to give the photo the oomph I was looking for.

