Tuesday, September 28, 2010

Floral Photography

If you ask me, floral photography isn't about representing the flower as a flower. It's more about the beauty of the organic forms created by the curl and lay of the petals or leaves. The flower becomes more than the sum of its parts, a work of natural art.


Sunday, September 26, 2010

Basic Portrait Lighting: Paramount Lighting


photo ©2009-2010 terese prodell 

As I try and teach myself the "proper" way to light a studio portrait, I thought I'd take the time to share what I'm learning with you if for no other reason than to solidfy the information in my mind.

There are five basic portrait lighting set-ups and the first one is paramount lighting. Paramount lighting is also called butterfly lighting because of the shadow that forms under the subject's nose. (See image above)
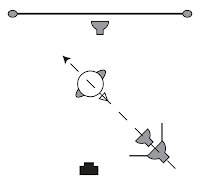
Looking at the lighting diagram, you can see that the basic set up has both the key light and the fill light on the same line at a 45ยบ angle from the camera line. The lights are set one above the other. The downward angle of the key light produces the harsh shadow under the nose and the diffused fill flash reduce the harsher shadows under the chin.
You'll also notice that in the diagram there is a flash unit aimed at the backdrop. Your subject should in front of the backdrop far enough so that none of the light from the key and fill lights (or as little of it as possible) reflect off the backrdrop. If you want your backdrop to be visible you'll need to light it separately.
One final note. Almost all portrait lighting set-up diagrams will include a hair light which is placed above and a little behind the subjects head so that the light it projects falls on the back and side of the head "rimming" or creating a halo effect as it reflects off the subjects hair. This is to separate the subject from the background adding depth to the portrait. I don't have it here because it's not strictly necessary although it can be very helpful with certain subject and backdrop combinations.

By the way, you don't need a lot of expensive equipment to do these set-ups. You can find cheap off-camera flashes at any camera store. I purchased my flashes at Midwest Photo Exchange for $85. Click on the "Strobist" link on the navbar on the left-hand side of the site to find basic lighting kits and accessories and check out the Strobist blog for more off-camera flash info.

Thursday, September 23, 2010

Lighthouse, Marblehead

Sometimes you drive all day to get to a location and the weather's crap and the best image you get all day is what you see below. Is your afternoon wasted? Not necessarily. Using a few simple Photoshop tools and a filter, you can make something outta nothing.

First of all, if the color is drab the best thing you can do is switch to B&W. There is only so much you can do with exposure, saturation and vibrance, but if you push too far the noise levels get out of hand real quick. So now that we've dispensed with the color, we can concentrate on contrast.

Above and beyond the subject matter, the interplay of light space versus shadow or contrast is what makes or breaks a black and white photograph. When I switched this image to black and white, I lost a lot of detail in the cloud cover and fiddling with the brightness and contrast sliders just wasn't getting it done for me so I had to switch to the burn and dodge tools to give the photo the oomph I was looking for.  
Despite what you may hear or read about photographers bragging about their pictures coming "straight out of the camera," don't let that discourage you from working with your photos to get what you want out of them. Ansel Adams never let a photo out of his studio without some sort of correction, so don't worry if you have to crop or do a little dodging or burning to get the print you want.

I used the dodge tool to get more contrast in the cloud cover on the left and right sides of the photo using the shadow setting and 20% for the exposure and simply going back and forth until I got the look I wanted. I also used that setting to increase the thickness of the black areas in the rocks and the trees, then I switched to highlights and added some emphasis to the some of the sand in the lower right hand corner. 

Finally, I'm currently on a kick where I like to smooth out the final image to give it a dreamy ethereal texture. You can do this in one of two ways. In the RAW editor, you can use the clarity slider before you open the image in Photoshop. Conversely, you can use the "surface blur" filter in the "Blur" filter menu. 

 The moral of the story is don't let the conditions you find at a particular location prevent you from finding an excellent photo even you have to make it yourself.


Wednesday, September 22, 2010

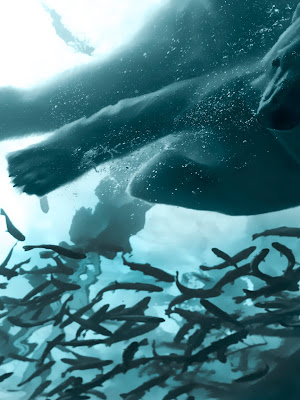
Polar Bear & Fish

Michelle and I love the new Polar Frontier exhibit at the Columbus Zoo. We can get some really great shots of polar bears in the water without all the hassle of neoprene wetsuits, scuba gear and, you know, freezing our butts off.

If you dream of being a wildlife photographer but don't have the time or budget to go on safari, a zoo membership is a great deal. We paid $69 for our membership and now we're at the zoo almost once a week. Best of all, now you can go after work and spend the entire afternoon at one enclosure trying to get that special shot.

Monday, September 20, 2010

The Spider's Web

I woke up yesterday morning to find this beautiful bit of construction hanging from my front porch. Having taken courses in photojournalism at OSU, I've had to break my prejudice against fiddling with a photograph to make it better. Luckily, I had the spray bottle full of water handy to give it a little pop. Now, I can justify having the spray bottle in the living room since it's not helping me train my cats not to scratch the furniture.